

Please note: This is a public-facing article.
Prerequisites:
- Apple Configurator iOS App downloaded from the App Store (On your phone)
- ABM Admin Access (Should be found in ITGlue if the org is fully deployed)
- The Mac must be equipped with a T2 chip or be an Apple Silicon Mac for this process to work.
Step 1
Open the Apple Configurator app on your iPhone and accept the terms. Then, sign in to the app with a Managed Apple ID from the client's Apple Business Manager account if you have not already. You may be prompted to sign in with two-factor authentication.
Step 2
Have the Mac you want to add in front of you and plugged into a power source.
If the Mac has already gone through the Setup Assistant process previously, you need to erase it before moving on to the next step. See Apple’s documentation for instructions on how to erase a Mac.
If the Mac is brand new and has not been set up before, move on to the next step.
Step 3
Start the Setup Assistant steps, and make sure your Mac is connected to the internet during the process. You first need to select the language. If you continue past the Country or Region setup pane, you will need to restart your Mac.
Step 4
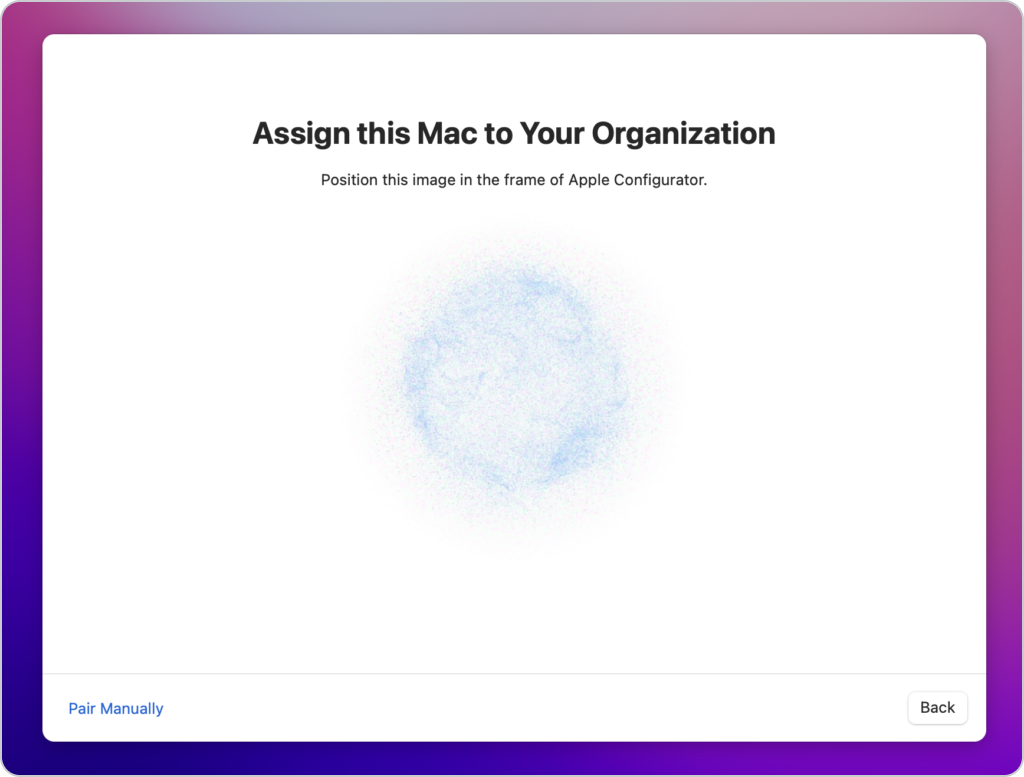
Hold your iPhone with Apple Configurator open close to the Mac. You should see a screen that says “Assign this Mac to your Organization”.
From this screen, you have two options:
-
Use the iPhone camera (with the Apple Configurator app open) to scan the image on the screen.
-
Select “Pair Manually” on the iPhone and click “Pair Manually” on your Mac. You will be shown a 6-digit code and be prompted to enter it.
You should see a notice on the screen saying the pairing was successful.
Note: If you have not already signed in with your Managed Apple ID from Apple Business Manager in Apple Configurator on iOS, it will prompt you to do so. Make sure to complete this step if you are prompted.
Step 5
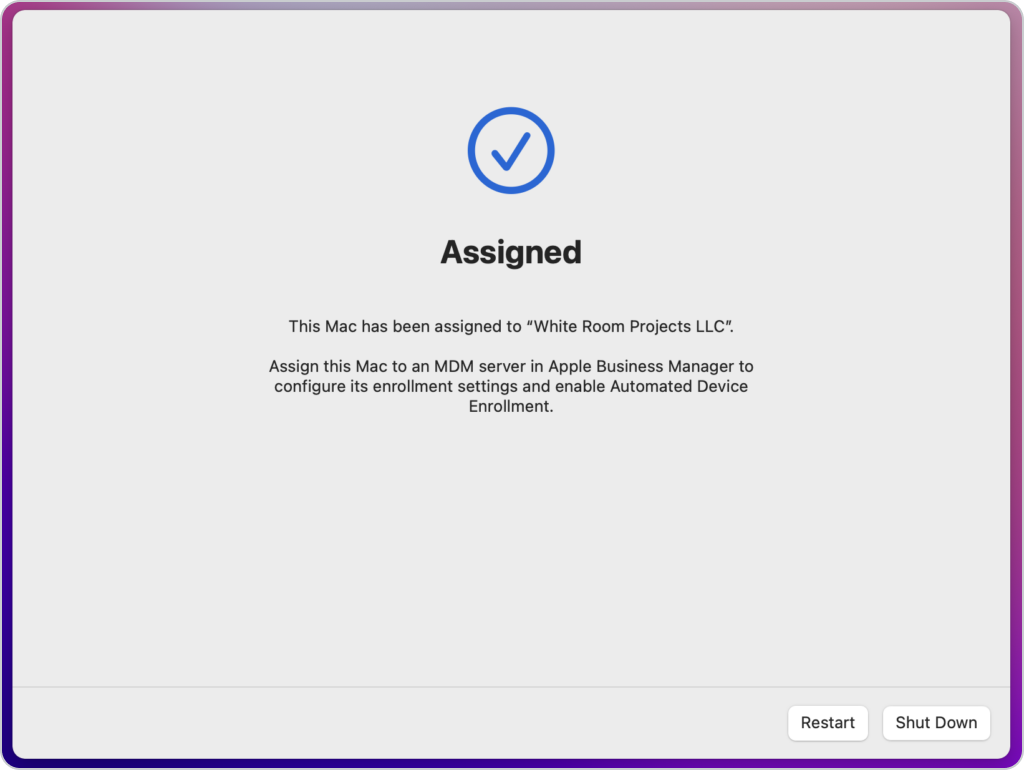
You should now see a screen saying “This Mac has been assigned to [your organization name].” This means the device has been successfully added to your Apple Business Manager account. However, at this point, the device has not yet been enrolled in MDM.
Don’t take any action just yet.
On Mac’s screen, you will see the options to Restart or Shutdown.
Don’t take any action just yet.
The word assigned may have changed to Added.
Step 6
Log in to Apple Business Manager, click Devices, Select Devices in the Sidebar and click the Mac that has the phrase Apple Configurator under the title.
Next, click Edit MDM Server, and in the Assign Menu, select Mosyle MDM and confirm the device is pointing to the correct MDM Server, Auto Assignment should have done this, but it's crucial that the device is pointing to Mosyle MDM.
Now log in to Mosyle Business, head to Organization, Click Apple Basic Setup and then Enrollment. Make sure that macOS is selected at the top. Now click Automated Device Enrollment, and click the View Device List under the Client Name / Organisation in the list. Click Update to force Apple Business Manager to accept the enrollment profile.
Now click Restart on the device you are enrolling.
Step 7
Once you can see that the device is pointing to the correct MDM Server in ABM, click Restart. The device should reboot and come back up to the hello screen, click Continue.
SHORTLINK: https://prpl.it/addmactoabm
Comments
0 comments
Please sign in to leave a comment.